A Dress Form for Students: What You Need for the First Year of Fashion School
Which dress form suits first-year students, which tools you need around it, how to mark style lines with tape before draping, and the difference between working at home and in the studio.
A dress form for first-year fashion design students needs to meet three conditions: a fixed size, a padded body that takes pins at any point, and a size that matches the dress forms in your school's studio. Collapsible shoulders are a clear advantage when you dress the form in a finished garment. Around the dress form you need a small, precise kit: pins, tailor's shears, curve rulers, a tape measure, chalk, style tape for marking lines and pressing tools. This guide walks through that equipment, how to mark style lines on the dress form, and the difference between working at home and working in the studio.
What you do on a dress form in your first year
In the first year you usually study two subjects that rely on the dress form: patternmaking, meaning drafting patterns, and sewing technology. For example, the first-year program of the Fashion Design Department at the University of Haifa's School of Design includes the courses Patternmaking A and B and Sewing Technology A and B.
Alongside drafting patterns on paper, a large part of the work is free draping: you place muslin on the dress form, secure it with pins and mark the design lines on it. In the Israeli Ministry of Education guidelines for the free draping exam in the 13th-year fashion design program, each examinee receives a dress form, scissors, pins, a tape measure, a pencil, tailor's chalk, a marker, muslin and red tape for marking. It is a good list to check your personal kit against.
Which student dress form suits draping and patternmaking
We covered the differences between dress form types and the measuring method in the guide to choosing a dress form. For a first-year student, these are the criteria that matter in practice:
Fixed size: The basic patterns you build in class are built on a body that does not change. On an adjustable dress form, gaps open between the sections when you expand it, and in those areas it is hard to insert a pin or run tape in a straight line.
A body that takes pins: In draping you insert dozens of pins in every class, including at an angle. A padded, fabric-covered body holds the fabric in place without slipping.
Collapsible shoulders: When you reach the stage of dressing the form in a sewn garment, pressing the shoulder plate lets you slip on a fitted dress or a jacket without straining the seams.
Sewn reference lines: Center front and center back, side seams and a waistline sewn onto the cover are the starting point for every line you mark afterwards.
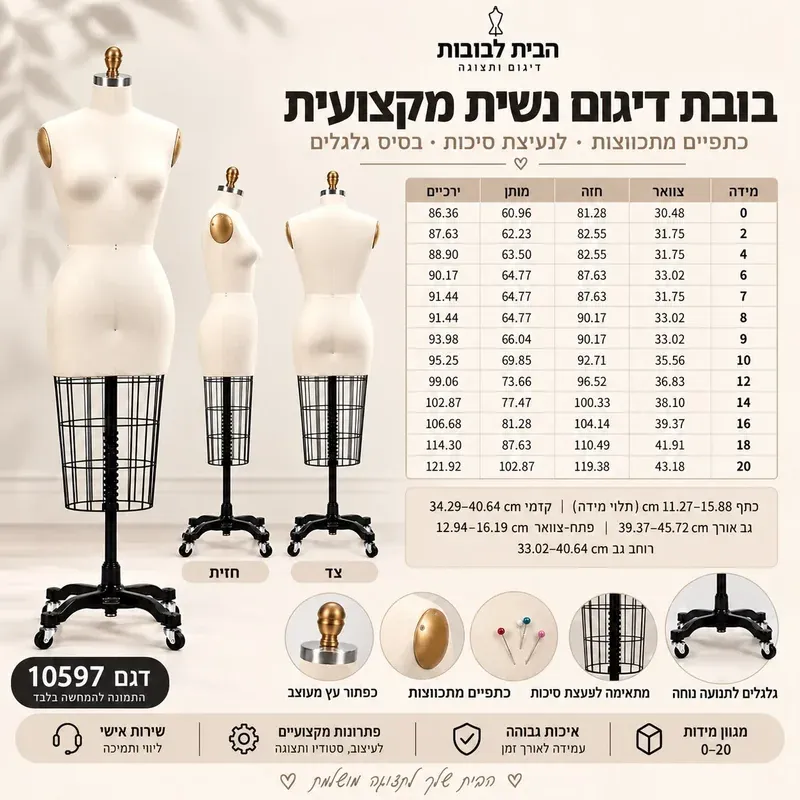
The professional dress form with collapsible shoulders and cage meets all four criteria: a padded body with a cream cover, sewn reference lines, a metal cage below the hips for marking hem length, and 13 fixed sizes from 0 to 20. A simpler alternative is the pinnable dress form on an adjustable stand, in the same 13 sizes, with height adjustment from 80 to 132 cm.
Both are sized according to the American system, and each size comes with a table of measurements in centimeters. Before buying, ask your school which size the studio dress forms are. When the dress form at home is the same size, you can start a design in class and continue it at home without altering the fabric.
The tool kit around the dress form
Pins
Fine, straight sewing pins are the tool that runs out fastest. In the pins category you will find, for example, PRYM pins in size 34×0.60 mm, and pearl-head pins that are easy to see on light muslin. Insert them at a sharp angle to the body of the dress form rather than perpendicular; that way the pin holds better and leaves fewer marks in the cover. A wrist pincushion saves you trips to the table in the middle of draping.
Tailor's shears
Equipment lists of fashion programs around the world include two separate pairs: scissors for pattern paper and fabric shears. Paper dulls the blade, so fabric shears are kept for fabric only. In tailor's shears you will find the Kretzer FINNY PROFI, 25 cm long with a 12 cm cutting length, and the PRYM Professional, 21 cm long and easy to control. For left-handed students there is a PRYM version with reversed blades, so the cutting line stays visible.
Rulers and curves
Marking on the fabric is only half the work. After you take the fabric off the dress form, you true the lines and transfer them to paper. For that you need three types of rulers:
A French curve for small curves: armhole, neckline and sleeve cap. The comma-shaped curve measuring 29.9×12.6 cm is designed for exactly this.
A long curve ruler for the hip line, side seam and hem, such as the 61 cm metal curve ruler.
A clear straight ruler for seam allowances, and an L-square for corners and perpendicular lines.
You will find all of them in curve rulers.
Tape measure, chalk and pencil
A flexible tape measure that does not stretch, tailor's chalk for marking on fabric, and a mechanical pencil for paper. A pencil in a second color helps tell an original line from a corrected one.
Pressing tools
Pressing is part of the grade: in the Ministry of Education guidelines for the free draping exam, pressing technique is among the skills assessed. Beyond the iron and the board, curved seams and darts are pressed on a rounded surface. Among the pressing cushions there is a mushroom cushion for darts and sleeve caps, and a 56 cm sleeve board for a full sleeve. While the garment is still on the dress form, use steam only and keep the iron away from the cover.
How to mark style lines on a dress form
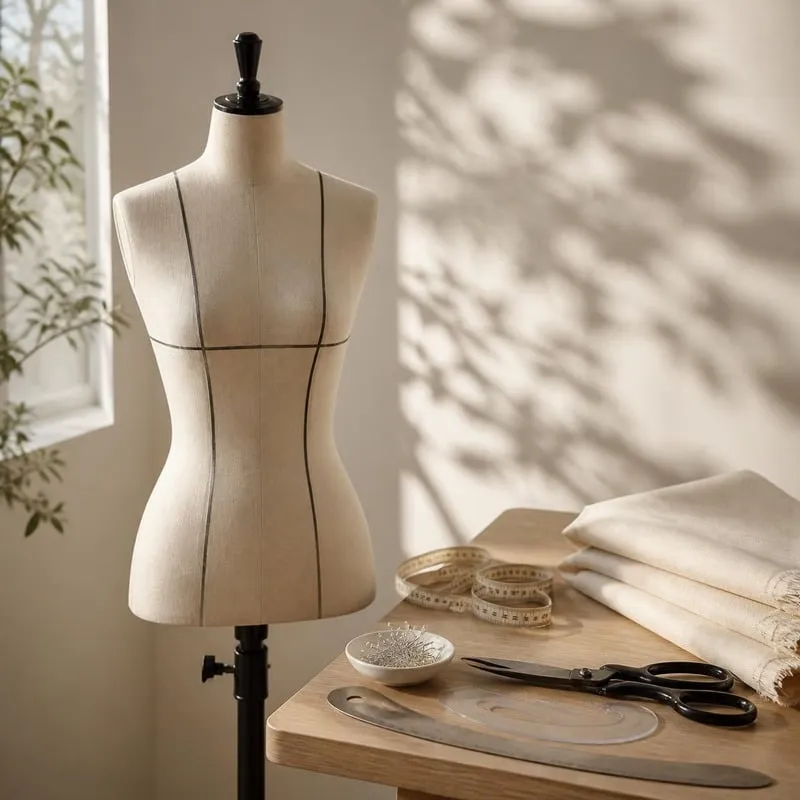
Before you place fabric, mark the design lines on the dress form with tape. This lets you see the proportions on a three-dimensional body before you cut. In the Ministry of Education exam, placing the tapes according to the proportions of the sketch is a separate stage the examiner can comment on.
Which tape: 6 mm wide adhesive style tape, thin cotton tape pinned to the dress form, or colored tape such as the red tape on the exam equipment list. Tape that is pinned on can be left on the dress form for several projects.
A common working order:
Start with the reference lines: center front, center back, waistline and side seams. On a professional dress form they are already sewn on; on a simple dress form, mark them first.
Bust line: a horizontal tape from the bust point on one side to the side seam on the other, parallel to the floor.
Shoulder blade line: measure the back from the neck to the waist and divide by four. The top quarter is the shoulder blade level. Mark from center back to the armhole, parallel to the floor.
Princess line: from the shoulder to the waist, front and back.
Then the design lines themselves: neckline, hemline, seam lines and pockets, according to the sketch.
After each line, step back a step or two and check that it is straight and symmetrical. The dress form's body is not perfectly symmetrical, so you need to check and correct. Before taking the fabric off, mark the seam lines and match points on it, and only then true them with the curves on the table.
Working at home vs. working in the studio
In the studio the dress forms are shared, and your time on them is limited to class hours. A dress form at home lets you continue a design, correct a toile and practice marking lines without waiting for a free dress form.
Space: The base of the dress form on the adjustable stand takes up 35×35 cm, and it weighs 4.7 kg. The casters let you roll it into a corner at the end of the day.
Working height: When working on a skirt, lower the dress form so the waistline is at eye level; when working on a collar and shoulders, raise it.
Care: Remove the pins at the end of every working day and cover the dress form so the light cover does not collect dust.
Group purchase: Several students from the same class can get a quantity-based price quote by phone or WhatsApp.
You can see all the dress forms in our showroom at 15 Kfar Giladi St., Tel Aviv, Sunday to Thursday from 08:30 to 17:00 and Friday from 09:00 to 12:00.
To choose a dress form by your studio's size, browse women's dress forms. For questions about sizes or a group order for your class, call 03-9444226 or WhatsApp 055-2473993.
Frequently asked questions
Does a fashion design student need their own dress form at home?
It isn't required, but it makes the work much easier. In the studio the dress forms are shared and only available during class hours, while a form at home lets you keep working on a pattern, fix a toile and practice marking style lines. If you buy one, it should be the same size as the studio forms.
Why should my dress form at home be the same size as the one at the studio?
Because then a design you started in class fits the form at home without alterations. Fabric draped on a form of a different size sits differently, and the style lines shift. Before buying, ask the school what size the studio forms are and choose the same size.
Which tape do you use to mark style lines on a dress form?
Use a narrow adhesive design tape about 6 mm wide, or a thin cotton tape pinned to the form. Some people work with a colored tape that stands out against the cover, like the red tape on the equipment list for the Ministry of Education's free draping exam. Tape that is pinned on can stay on the form for several projects.
Which pins are suitable for draping on a dress form?
Fine, straight sewing pins that slide easily into the fabric and the body of the form. Pearl-head pins are handy because they are visible on light-coloured muslin and easy to collect. Pin at a sharp angle to the body rather than perpendicular, so the pin holds better.
Do I need a dress form with collapsible shoulders in my first year?
For draping raw fabric it is not essential, because you lay the fabric directly on the body. The advantage shows when you dress the form in a finished garment, such as a fitted dress, a tailored jacket or a garment with a narrow neckline. You press the shoulder plate inward, slip the garment on and release it, without straining the seams.
What is the difference between a French curve and a long curve ruler?
A French curve is small and used for sharp curves: armholes, necklines and sleeve caps. A long curve ruler, about 60 cm long, is used for gentle, long curves such as the hip line, side seam and hem. In your first year you need both, together with a clear straight ruler.
What is a princess line and how do you mark it on the dress form?
A princess line is a vertical seam line running from the shoulder, through the bust area, down to the waist. On the dress form, mark it with tape from the shoulder to the waistline, front and back. Check from a distance that the line is continuous and symmetrical on both sides.
Which fabric is used for draping in the first year?
Work with plain, unbleached cotton fabric, also called muslin or toile. Mark it with pencil and chalk and test the pattern on it before cutting the final fabric. Unbleached calico also appears on the equipment list for the Israeli Ministry of Education's free draping exam, and on equipment lists of fashion programmes around the world it appears as an item for samples.
How much space does a dress form take up in a small room?
The dress form on the adjustable stand, for example, stands on a 35×35 cm base and weighs 4.7 kg. The height adjusts between 80 and 132 cm, and the casters let you roll it into a corner when you're not working. When it's not in use, cover it so it doesn't collect dust.
Which tailor's shears suit left-handed students?
Left-handed tailor's shears are built with reversed blades, so the cutting line stays visible and the blades press against each other while cutting. PRYM makes left-handed tailor's shears 21 cm long.